Kisters 3DViewStation WebViewer
Backend mode (session based security)
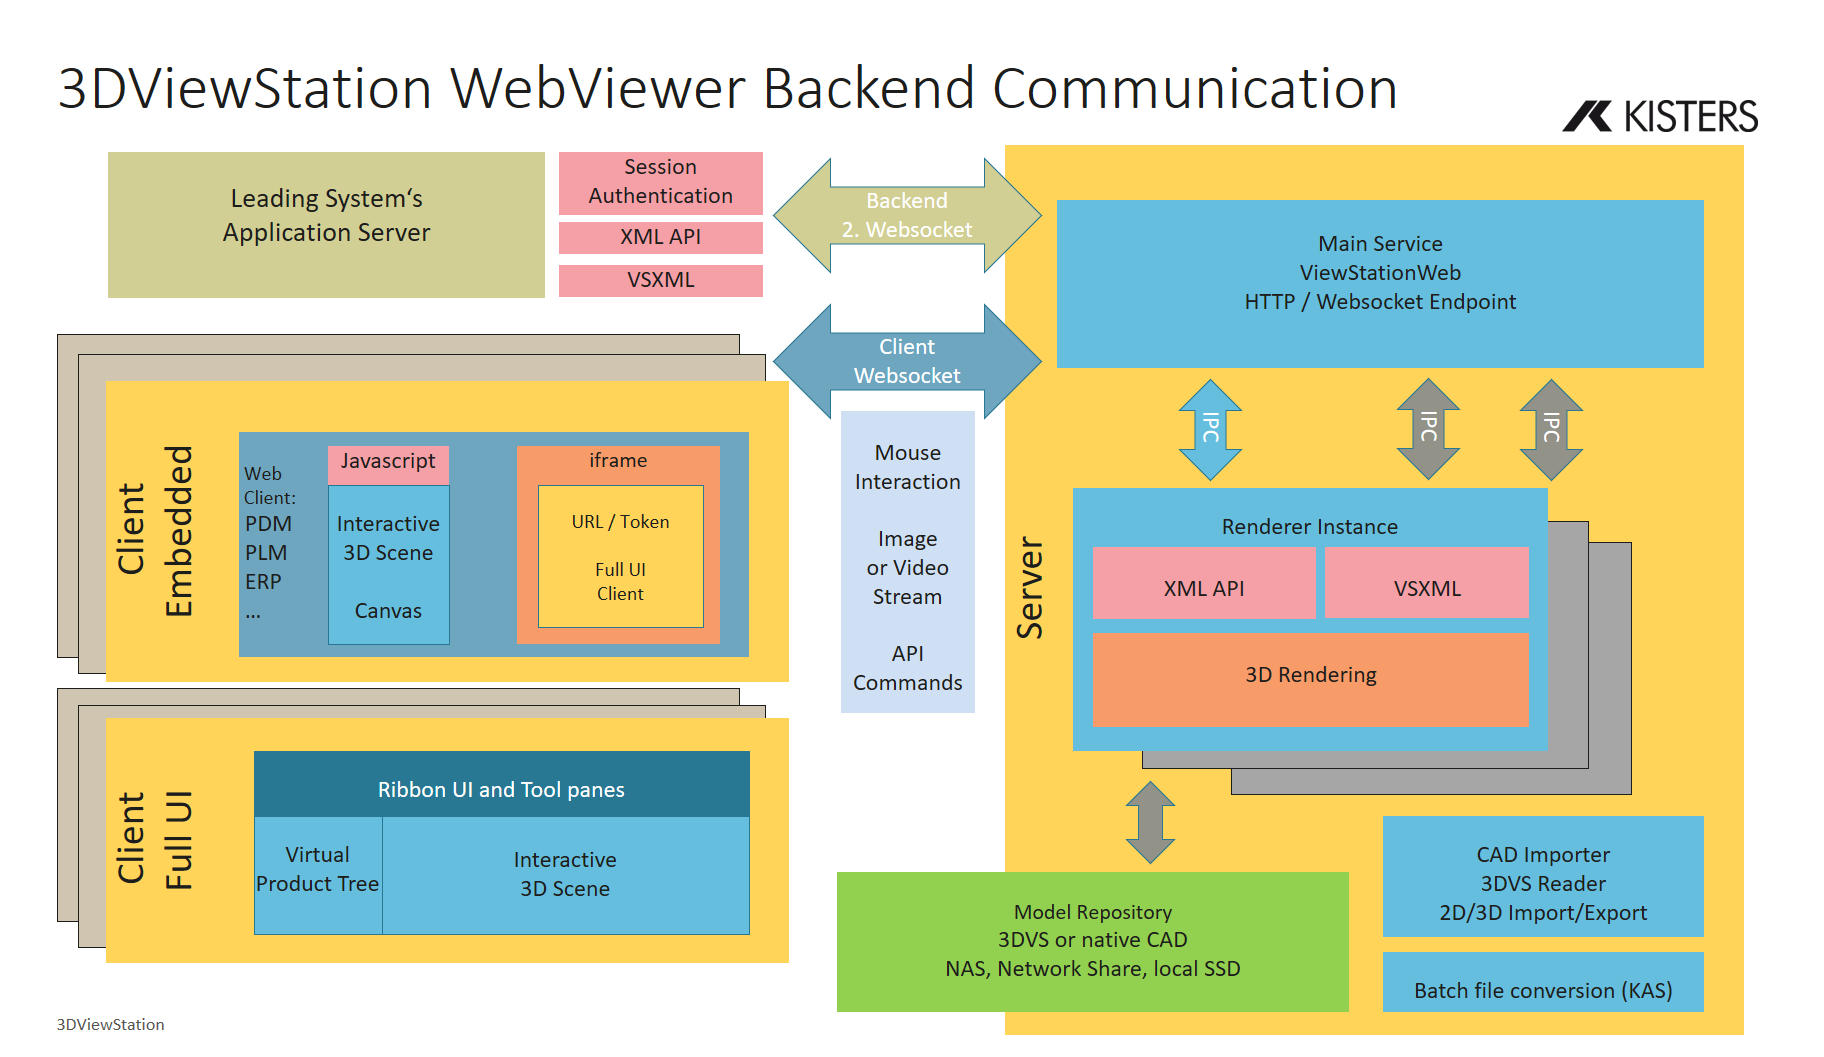
WebViewer‘s Backend mode supports a separate websocket port for direct communication between leading systems application server and the WebViewer server. There is no need for indirect sending and receiving API calls and events by pushing them to the javascript client first.
The client websocket port is still used for communication between client and server for transferring image stream and interactions.
In Backend mode the WebViewer server does not allow to start a session without prior authentication by a connected leading system's application server before. This way we implement our session based security feature. A firewall or proxy in front allowing connections for valid application servers only should secure the WebViewer's second websocket port. We do also recommend to operate a proxy for SSL off-loading in front of the WebViewer server (NGINX, Apache, IIS ...) in productive environments.
After connecting to second backend websocket port leading system sends a custom token used for authentication as one time key. On successful session authentication this token is consumed and the leading system receives an authentication succeeded event containing the client's id. This ClientId has to be send with all XML-API calls and events belonging to this session. Before sending first XML-API command like OpenFile wait for SessionReady event.
Leading system can list all active clients and terminate or transfer sessions.
WebViewer Backend mode is available for Full UI and embedded scenarios.
For full UI WebViewer client pass your custom token in the URL on starting new WebViewer browser tab or iframe. Other full UI client URL parameters (like open or compare) are not available any more.
Send all XML-API calls for controlling a WebViewer client session directly on the second websocket port with ClientId as session identifier.
For embedded client send the token from client javascript after initializing the client and receiving sessioninfo event.
Have a look at Backend Cockpit sample code in vsweb-example-backend-cockpit.html/.js for details.
You can enable Backend mode and define Backend websocket port in "ViewStationWeb.ini"
Pre Authentication
Sending custom token used for authentication first. Then starting the session by passing same token. New session authenticated directly. Authentication succeeded event contains sessions id, client IP and consumed token for reference.
Post Authentication
This option may be used for load balancing scenario with more than one WebViewer server. Load balancer can allocate the client to one of the WebViewer servers. This WebViewer server sends waiting session events to all backend application servers connected by backend websocket.
Starting a new session URL with custom token first. New session is waiting for authentication or will run into timeout.
WebViewer server sends event for waiting session containing token and client iP to backend application servers. Application server responsible for this client session will send same custom token for authentication. Session-is-started and authentication-succeeded events contain the client ID and consumed token for reference.
Subsequent events after successful authentication belonging to one session are just send to the authenticating application server.
Sessions can be transfered between application servers.
Typical communication for session authentication
API calls and events
WebViewer server <-> leading systems applications server
- Backend (Login required if [Backend] Key defined in "ViewStationWeb.ini")
x
<Request Type='AuthenticateBackend'> <Key>PassphraseDefinedInWiewStationWebIni</Key></Request>
- Backend Pre Authentication session sending custom token
x
<Request Type='AuthenticateSession'> <Token>A32E4A20-3E93-41AF-A391-6EC0C2822791</Token></Request>
- Start client URL:
http://localhost/index.html?language=ENU&token=A32E4A20-3E93-41AF-A391-6EC0C2822791
- ClientId Authenticated: 2091b0e6-d13a-4cae-b388-b374effa14e9
- Map ClientId for the autheticated session matching your token
x
<Push Type="XMLEvent"> <BackendEventList> <BackendEvent> <ClientId>2091b0e6-d13a-4cae-b388-b374effa14e9</ClientId> <ClientIP>192.168.137.1:80</ClientIP> <Token>A32E4A20-3E93-41AF-A391-6EC0C2822791</Token> <Authentication>Succeeded</Authentication> </BackendEvent> <BackendEvent> <ClientId>2091b0e6-d13a-4cae-b388-b374effa14e9</ClientId> <Event Type="SessionStarted"></Event> </BackendEvent> </BackendEventList></Push>
- Wait for SessionReady event
xxxxxxxxxx<Push Type="XMLEvent"> <BackendEventList> ... <BackendEvent> <ClientId>2091b0e6-d13a-4cae-b388-b374effa14e9</ClientId> <Event Type="SessionReady" ViewId="0"/> </BackendEvent> </BackendEventList></Push>After event SessionReady Received -> Send API calls to [1] open a new scene and update the scene or [2] just open a file
[1.1] Backend send NewScene (and some initial scene settings)
xxxxxxxxxx<Request Type='XMLCall'> <ClientId>2091b0e6-d13a-4cae-b388-b374effa14e9</ClientId> <Call Method='NewScene3D'></Call> <Call Method='SetSceneSettings'> <Settings> <Scene> <General> <SelectionModeModifier>SelectCustomNodeId</SelectionModeModifier> </General> <Alignment> <UpVector>Y</UpVector><VAngle>30</VAngle><HAngle>-45</HAngle> </Alignment> </Scene> </Settings> </Call> <CallMethod='AlignView'> <Alignment>Isometric</Alignment> </Call></Request>- [1.2] Backend Send UpdateScene for initial loading VSXML description of the scene or updating the scene (The scene differences in subsequent updates are calculated and executed in optimized way).
xxxxxxxxxx<Request Type='XMLCall'> <ClientId>2091b0e6-d13a-4cae-b388-b374effa14e9</ClientId> <Call Method='UpdateScene'> <Incremental>false</Incremental <KeepCreatedNodes>false</KeepCreatedNodes> <VSXML> <Node Type = "1" Name = "assembly root"> <Attribute key= "my key" value = "sample 1234"/> <Node Type = "2" Id = "2" Name = "part one" CustomId = "demo00401516" FileName ="\subdir_of_repository\part_one.3dvs" Transformation = "1 0 0 0 0 -0.95105652 0.30901699 0 0 -0.30901699 -0.95105652 0 -506.49549569 442.47625679364.3914868 1"> <Attribute key = "my comment" value = "with transformation"/> <Attribute key = "oen more attribute" value = "some text"/> </Node> <Node Type = "2" Name = "last part" CustomId = "demo00406085" FileName ="\subdir_of_repository\last_part.3dvs"> <Attribute key = "my comment" value = "no transformation"/> </Node> </Node> </VSXML> </Call></Request>
- [1.3] Or Send Import for adding files to the scene or Send ImportVSXMLToNode for importing VSXML
xxxxxxxxxx<Request Type='XMLCall'> <ClientId>2091b0e6-d13a-4cae-b388-b374effa14e9</ClientId> <Call Method="ImportFile"><FileName>subdir\0_saw.asm.1.3dvs</FileName></Call></Request>
- Or option [2] Backend Send OpenFile for loading a file from model repository
xxxxxxxxxx<Request Type='XMLCall'> <ClientId>2091b0e6-d13a-4cae-b388-b374effa14e9</ClientId> <Call Method="OpenFile"><FileName>_micro engine.CATProduct.3dvs</FileName></Call></Request>
- Backend sending commands to change the view (like alignment and fit all)
xxxxxxxxxx<Request Type='XMLCall'> <ClientId>2091b0e6-d13a-4cae-b388-b374effa14e9</ClientId> <Call Method='AlignView'><Alignment>Isometric</Alignment></Call> <Call Method='FitAll'></Call></Request>
Sending your additional API calls and receive events (for e.g selection changes)
...
- For preventing proxys from closing the websocket connection (typically after 60 seconds inactivity) start a timer for sending ping messages every 20 second if no other message was sent.
xxxxxxxxxx<Request Type=\"Ping\"></Request>